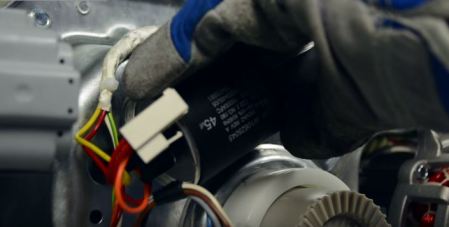
If your washer won’t spin or agitate, it may be a problem with your Splutch Cam Kit. The Splutch Cam Assembly transfers energy from the motor to the transmission in your washer, allowing it to spin. This repair is relatively easy to complete yourself, and to help you out we have an easy Step-by-Step Repair Guide for you today.
You may notice that the first few steps are VERY similar to our Drive Belt Replacement guide. If both your Drive Belt and Splutch Assembly are damaged or are not functioning properly, you can easily complete both repairs at the same time since you will already have access to that area of the washer.
If you don’t already have the parts, you can find a Splutch Cam Kit for your washer model on our website.
*WARNING: Before starting any repair, always make sure that the appliance is completely disconnected from the power source by unplugging it. This tutorial is meant to be a guide and should not be used in place of the installation instructions provided by the manufacturer.
Required Tools:
-Nut Driver
-Phillips Head Screwdriver
-Channel Locks
-Socket Wrench
-Tape
-Large Towel (optional)
Removing the Old Splutch Cam Assembly
1.) Unplug the washer and shut off the hot and cold water supply to the appliance, you may need to pull the washer away from the wall
2.) Unhook the Drain Hose and disconnect Water Supply Hoses on the back of the washer using the Channel Locks to loosen them
3.) Close the lid and secure with a piece of tape
4.) Lay a towel on the floor in front of the washer to help absorb any water and prevent scratching
5.) Carefully tip the washer forward and lower onto the towel to access the motor at the bottom of the appliance. The washer will be heavy, we recommend you have someone help you.
6.) Remove the screws securing the Pulley/Belt Shield and set aside
7.) Slowly rotate the Splutch or Transmission Pulley (the larger of the two pulleys) and pull the drive belt until it comes off.
8.) Locate the nut on the Splutch Pulley and loosen with your wrench. Use your hands to unscrew and remove the nut. Remove the Pulley Wheel.
9.) To remove the Shift Actuator, press in the tab on the wire harness to release. Remove screws securing into place with a Phillips head screwdriver. Set Shift Actuator aside.
10.) Release the Start Capacitor by disconnecting the wire harness. Slowly turn the capacitor counter-clockwise and carefully pull out.
11.) Press in the tabs on the top and sides of the Splutch Kit to release. Firmly grip the assembly and carefully pull off of the washer Transmission.
12.) Remove spring
Installing the New Splutch Cam Assembly
1.) Place the new spring
2.) Prepare the main components of the Splutch Cam Kit before placing on the washer
-The larger white ring will be the outside, place the Cam Ring in the middle so it is flush
-Once rings are together, set the Splutch in the middle
3.) Place the three parts over the spring already on the transmission with the tab/hole in the Cam Ring on the bottom left
4.) There will be a cross or “X” on the back of the Start Capacitor. Line this up with the square opening and place the capacitor at the same angle you removed it. Turn clockwise until snaps into place
5.) Reconnect the wire harness
6.) Replace the Shift Actuator, making sure the knob goes through the tab/hole in the Cam Ring
7.) Line up the holes and replace mounting screws. Reconnect wire harness
8.) Place the new Pulley Wheel, rigid side to the back. Replace nut and tighten with wrench.
9.) Line the grooves on the new belt up with the grooves on the Motor Pulley (the smaller pulley) and guide the belt onto the Splutch Pulley. Slowly rotate the pulley until the belt is aligned and in place.
10.) Turn the Splutch Pulley a few more times to make sure the belt is in place
11.) Replace the belt cover and screws
12. ) Tip the washer upright and remove tape
13.) Reconnect hoses and turn the water back on
14.) Plug in the washer and test it out
Altogether this repair should only take 20-25 minutes to complete. If you’re ever unsure during the repair process, do not hesitate to consult your appliance manual or contact a service technician. You can find Splutch Cam Kits, Drive Belts, and many other replacement washer parts on our website!
Have a question, comment, or tip? Be sure to to leave it for us below! Like, share, and subscribe to find more washer posts, appliance repair guides, and tips on the 1st Source Servall Blog.


